

How To Repair Broken Book Binding
This post contains affiliate links. If you click and purchase nosotros may make a commission, at no boosted charge to you. Please see our disclosure policy for more details.
While I honey my Kindle and its practicality, there's nothing quite like reading a concrete copy of a book. Be it hardback or paperback; there'south something about picking upwardly a hard copy of a novel that you can't replicate with an due east-reader.
Just the problem with real-life books is that different their digital counterparts, they can hands get damaged, and eventually, they're going to fall apart. No matter how careful you are, years of wear and tear will degrade the book binding, and in that location volition come a twenty-four hours when your pages commencement to come loose. And as any avid reader knows, there'south nothing worse than beingness mid-way through a neat novel to observe that you're missing a page.
But don't worry, there is a solution. If yous have a book in need of some TLC, in that location are a few simple solutions you can try. Here are two methods to repair book binding and save your old paperbacksand hardbacks from the trash tin can.
Repairing Book Binding
When you notice that a book's pages are coming loose, you might be tempted to reach for the tape or glue to provide a temporary set up. But look! Earlier yous caput in with the nearest sticky craft item, consider the long term effects these will have on the pages.
Regular record, glue, and glue sticks can severely damage the pages and bounden of a volume. To do a good restoration job, you'll demand quality tools that are designed specifically for preserving and protecting books.
That existence said, if you lot only have an old beat-up paperback that you desire to finish before it heads into the recycling, and so, by all means, tape it upwards. At that place's no need to go in for a professional person finish if you're not attached to the volume, or it's a cheap copy at the end of its life.
But if you have a book that is special for whatsoever reason that you'd like to preserve for years to come up, and then requite the post-obit at-home book binding repair methods a try.
Method #i: Repair loose pages
If the spine of your book is still relatively intact, but some of the pages take fallen out or are coming loose, then it's time to act.
Pace 1: Gather Your Tools
Before you become started, gather the tools you're going to demand to repair your volume binding.
- Acid free mucilage
Regular glue, whether it comes in a pot or in mucilage stick grade, will oftentimes contain some kind of acid. Over time, this type of glue will harm both the paper and the spine of your book, leading it to corrode and autumn apart.
You can utilize officially branded 'book bounden glue,' which is, of course, acid free and designed specifically for the purpose of repairing former books. Merely you lot can also find multi purpose acid-free glue at your local craft store, which works only as well and may end up costing yous less.
- A glue application tool
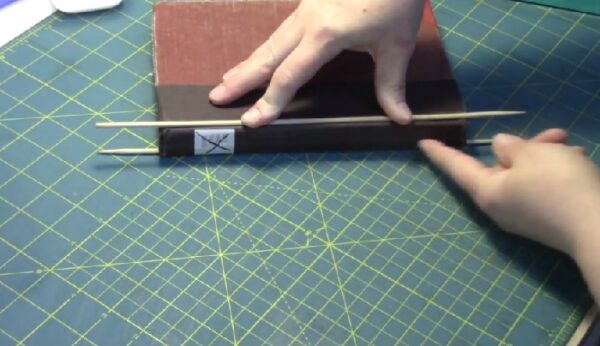
You're going to need something to apply the mucilage with. Anything long and relatively thin will piece of work, but a bone binder is platonic; these are designed specifically for paper crafts and leave a really crisp, clean finish. Don't worry if you don't accept one; a knitting needle, popsicle stick, or even a set of toothpicks will practise the job simply fine. Look for any object that will spread the gum evenly and precisely without making a mess.
- A heavy object
Once you've practical the gum to the border of the binding, you're going to need to weigh information technology down so that information technology dries securely in place. Heavy books are the perfect tool for this, but you could likewise use workout weights or fifty-fifty cans of food from your pantry!
Step ii: Prepare Your Work Expanse
Make sure you have a large, make clean surface area to piece of work on. To protect your workbench or desk from getting stained by the glue, lay out a plastic sheet or cutting open a plastic pocketbook to create a barrier between the projection and your surface. Avoid using paper, as this tin can cease upwardly getting stuck to the binding or the pages of the book.
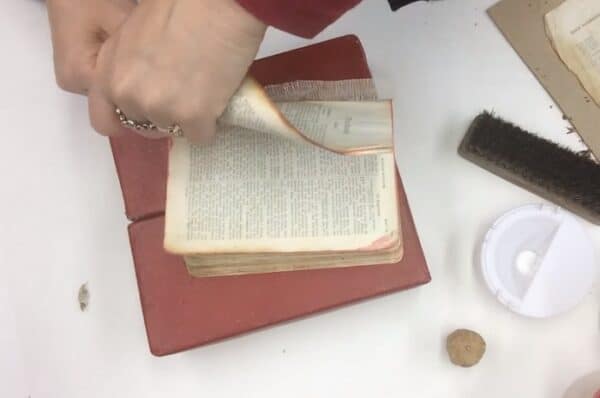
Step 3: Remove the Loose Pages
Carefully remove the loose pages in your book, existence sure not to tear them as you lot get. If pages are simply partially detached from the book binding, you'll demand to evaluate how damaged the edges are before yous make up one's mind to move forward. For a page that is more than than 1-tertiary detached, I recommend carefully removing and post-obit this repair method, as the trouble will only become worse if it's left alone.
Equally you remove the pages, brand sure to keep them in the correct order. The last matter yous desire to practice is glue them back in out of sequence! Likewise, be certain to keep the pages in a safe space far away from where you plan to apply the glue, so they don't get damaged.
Step 4: Apply the Gum
Open your volume in the middle and apply a thin layer of the acrid free gum to the inside edge of the spine, paying particular attention to the areas where the pages are missing or loose.
And then, utilize your glue application tool to gently and carefully spread the glue into an even layer from top to lesser.
Pace 5: Reattach the Pages
First things outset, make sure to launder your hands if yous take whatever glue residual on them; y'all're about to pick upwards your pages, and y'all don't want to go glutinous fingerprints all over them. Having said that, the gum will set relatively chop-chop, so once your easily are clean, don't delay!
At present, making certain that the pages are in the right order, stack them into a group. The cardinal here is to line them up perfectly so that they are all evenly set together.
At present printing the grouped pages firmly into the glued side of the spine, making sure they line up with the residue of the pages in the book. Check that all the pages are touching the glued side at their edge. If not, pull the grouped pages away and apply a footling extra gum to brand sure they all adhere properly.
Step vi: Weigh Information technology Downward
Now it's time to shut the book and identify your heavy books/weights/cans etc., on top of it. Calculation this weight will make sure that the glue forms a tight seal around the edges of each folio and so they're securely attached.
Get out the weights on acme for a minimum of 24 hours. Once yous open it up, your book should exist fully repaired!
If, for any reason, there is a rouge page that hasn't managed to stick, then follow the same steps once again, but this time, apply just a thin strip of gum to the area where the missing page should be. Attach it back on, weigh it downwardly, wait 24 hours, and voila, a newly revived book binding!
Method 2: Repair the Hinge
If the hinge (also sometimes called the joint; the within section where the front of the cover meets the spine of the volume) of your book is broken, or information technology looks like it is most to intermission, this can also result in loose or lost pages, and a destroyed volume. But don't worry, all is not lost. Hither's what to do.
Step one: Gather Your Tools
We need some different tools for this book binding repair method, so before you lot become started, gather together:
- Unmarried run up folder tape
You tin can get unmarried stitch binder record from many large craft stores, or you can order information technology online. It'due south essentially a durable tape designed specifically for repairing books. It's available in a variety of widths; just make certain to cheque information technology against your book and get one wide enough to provide a solid replacement swivel.
Some brands of binder tape come with a pre gummed adhesive dorsum, which is platonic for this job as y'all don't need to deal with any messy glue. But many brands require y'all to apply your own adhesive. If you have this blazon of tape, yous'll besides demand…
- Acid gratuitous glue
Simply like in Method one, acid complimentary glue is the only mode to go when it comes to repairing your book hinge. If you lotareusing glue, so you lot will too need something to apply information technology to the folder tape too. A soft brush that you lot don't mind throwing abroad afterward is perfect for the task.
- Wax newspaper
If you're using glue, y'all'll need a sheet of wax paper slightly bigger than your volume to protect your pages as they dry out.
- Some actress-large rubber bands
To button the spine against the binder tape and make certain information technology adheres correctly, gather some extra-large, heavy duty rubber bands. 2 or three should do.
Pace ii: Remove the Hinge
Even if the hinge is simply partially damaged or missing, you're going to want to remove the whole thing in order to practice a neat and durable repair job.
If the hinge is tricky to have off and removing it may impairment the remainder of the inside embrace or the text block, don't worry. Using a arts and crafts knife, y'all can carefully slice down the centre of the hinge, in the gap between each side, to separate both sections and get out the old binding tape or paper swivel in place underneath.
At present use a pair of pair of scissors to trim away any excess threads, old glue, or bits of paper that might remain. Bank check to make sure there is no loose cloth on either cover; if there is, carefully apply the acid-free glue and re-attach them apartment against the cover.
Stride 3: Mensurate and Cut the Folder Record
Measure the elevation of the text cake (the actual pages of the book, rather than the encompass), and cut a section of unmarried run up binder tape to lucifer this measurement
Pace 4. Apply the Binder Record
If your tape doesn't already come with an adhesive bankroll, and then use a soft brush to carefully apply a thin and even layer of the acrid-free gum to ane side of the bounden tape.
Apply the tape along the edge of the text block, with one tab attached to the spine of the volume and one tab on the front or back folio of the text block.
Now smooth the record over with make clean fingers or a bone folder, if you lot have one. Brand sure to button out any excess glue, and ensure information technology's stuck downwardly firmly to both sides of the surface.
Footstep v: Let it Dry
Ideally, leave the record to dry out overnight, or at to the lowest degree for a few hours. You can double-check that the adhesive is fully set by running a finger lightly over the surface and feeling for any wetness.
Pre-gummed, agglutinative-backed binder tape sets much quicker than using glue, and yous should be able to continue to footstep 6 most immediately afterward applying the tape.
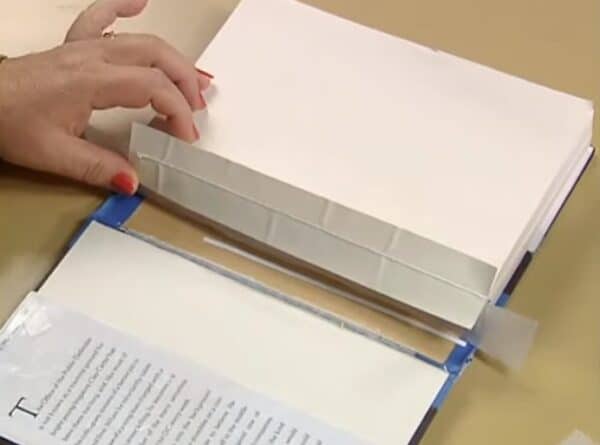
Step 6: Insert the Waxed Paper
Identify a canvass of waxed newspaper slightly larger than the pages of your volume on peak of the text cake. Brand sure information technology's on tiptop of the folder tape that is already glued to the page but below the binder tape that is yet to be glued.
Cut a smaller strip of waxed newspaper to friction match the size of the spine of your volume, and insert this in at that place also, to protect it from any excess glue.
Stride 7: Apply the Folder Tape
If you demand to, use the acrid free glue carefully to the two remaining tabs (skip this if you have pre gummed tape). At present, slowly and gently pull the comprehend of the book up so that it makes contact with the gluey part of the tape, where information technology should naturally fit to let the volume fall open and closed.
Now, close the book, and employ business firm pressure against the spine using a clean finger or a os folder. This will adhere the final exposed piece of binding tape to the inside tube. Get out the waxed paper in place for now.
Stride 8: Wrap in Prophylactic Bands and Let Dry
Take your rubber bands and wrap them around the book to apply pressure against the spine and brand sure the adhesive connects with the surface. Let it dry for at least 24 hours if possible to make sure information technology's fully set before you open the book support.
At present you can remove the prophylactic bands and advisedly peel away the wax paper strip and canvas to reveal your newly repaired book swivel!
Conclusion
Just considering a book's binding is a little crush upward doesn't mean it's ready for recycling. Past following these easy methods at dwelling house, y'all'll be able to bring a new lease of life to your favorite books so they tin exist enjoyed for years to come.
For more tips on looking after and protecting books then that they can bring joy to future generations, check out our handy guide to preserving sometime books in 4 easy steps.
Source: https://www.hookedtobooks.com/how-to-fix-book-binding/
0 Response to "How To Repair Broken Book Binding"
Post a Comment